
Note: the following process should be followed for both 8” and 10” iProda Android tablets
Before beginning the tablet provisioning process, make sure you have the iProda Tablet powered on and connected to your PC via a USB cable. Also make sure that you have the following applications on your PC:
- ADB terminal emulator (cmd-here.exe)
- iProda SN Writer
- Internet browser for access to the Renatus portal
Step 1: Configure tablet settings
With the tablet powered on and connected to the PC, open the ADB terminal emulator if it is not already running by double-clicking the cmd-here.exe executable file.
In the ADB terminal, type the following command and press enter:
.\settings
Once you press enter, the terminal should begin to run through the different settings being configured by the script. If no errors are encountered, the script should conclude with the following line:
Rebooting tablet
After this, the tablet will reboot. At this point, you can proceed to Step 2.
Note: If you encounter the following error:
Enforcing: SELinux is Enabled, Reimaging of tablet is required.
then the tablet will require reimaging before it can be provisioned using this process. Please consult the Tablet Reimaging instruction document for details on this process.
Step 2: Downloading CCU applications
If the tablet is not still plugged into the PC, reconnect it at this point. Wait until you see the home screen on the tablet load before proceeding.
In the ADB terminal, type the following command and press enter:
.\renatus
This will begin loading the Renatus app and 75F Home app onto your tablet. After it completes, your tablet will restart again. Proceed to Step 3.
Step 3: Set the Home App and permissions
Once the tablet reboots, it will load to a black screen with a prompt for selecting a home app. Select the 75F Home app and then tap “Always”.
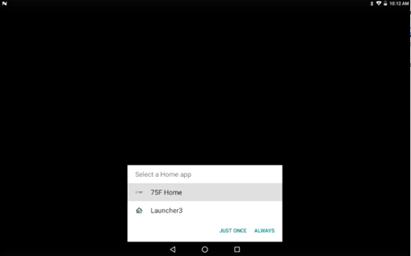
After this, the CCU app will load for the first time. Allow it to load completely, then tap the circle button on the lower menu. This will refresh the app.
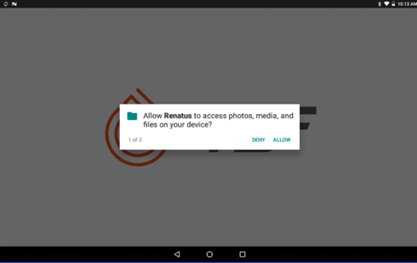
As the app refreshes, watch for a series of three pop-up prompts with permissions for the Renatus app. As you see them, tap the “Allow” button for each.
Step 4: Generate Building Passcode
For this step you will want to have the building code for your test site ready. If you do not have one, or need to regenerate one, you will need to log in to the Renatus portal through the internet browser on your PC.
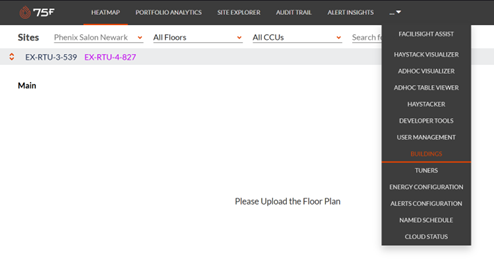
In the Renatus portal, select the “Buildings” tab from the drop-down menu in the upper middle of the screen.
In the Buildings screen, search for your site name in the search bar. Once you locate it in the search results, click the “Generate Passcode” button.
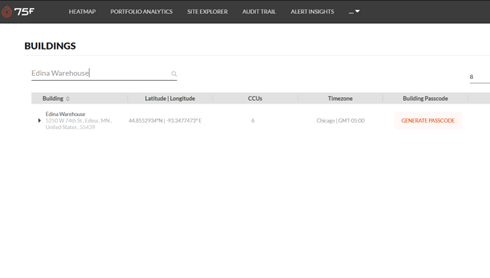
A popup will appear with your Building Passcode. You will need it for the following step.
Step 5: Register Renatus for testing
With the Renatus app loaded, tap the “Next” button on the right side of the screen to advance through the registration menus. When you are prompted for the type of install, tap “Add to Existing Site”.
The app will prompt you for a building passcode. Tap the field on the screen for the first digit, then type in your Building Passcode from the previous step. Tap “Next”, then tap “OK” on the following prompts.
The tablet will then prompt you for a CCU name and pairing address. For the batch of tablets that you are testing, use your initials plus incremental numbers as CCU names. Set the address to an unused address, preferably in a higher channel if available.
At this point, continue tapping “Next” on the remaining screens until the registration is finished and the CCU app begins running.
Step 6: Pairing test
For the pairing test, you will need a Hyperstat and a CM – preferably the CM that was packaged with your tablet. Both will need to be flashed with the latest production firmware – see the CM Flashing and Hyperstat Flashing instruction documents for details on these processes.
Connect the tablet to your CM, and make sure the CM and Hyperstat are connected to 24V power supplies.
On your tablet, navigate to the Floor Layout screen in the settings menu by tapping the gear icon in the upper right corner of the screen. Then, create a floor and zone for your Hyperstat by tapping the “Add Floor” and “Add Zone” buttons, and entering generic names.
Tap the “Pair Device” button for your new zone, then select the Hyperstat option in the pop-up screen. From there, select any profile.
On your Hyperstat, navigate to the Installer Options menu by pressing and holding the rightmost two buttons, then using the left button to switch between the menu screens. In the Installer Options menu, select “Pair to CCU”.
Back at the tablet, select your Hyperstat on the device list. The pop-up will then ask for the Hyperstats PIN number. Enter it as displayed on the Hyperstat screen, then tap the green enter button. If the PIN number is correct, the Hyperstat should display a confirmation message, and the tablet should show a Device Configuration screen. Scroll to the bottom of the screen, and tap “Set”.
From here, navigate back to the Status screen by tapping the dial icon in the upper right corner of the screen. You should see your new Hyperstat zone. Wait until it displays a temperature value from the Hyperstat – this will confirm that the communication between the devices is working. You may be able to expedite this waiting period by toggling between the Settings and Status screens.
Step 7: Unregister and clear the tablet
If the pairing test was successful, you can now unregister the tablet. Navigate back to the Settings screen by tapping the gear icon, then tap the “Settings” tab. You should see your registration information on this screen. Scroll to the bottom, and tap the “Unregister” button.
Once the tablet has been unregistered, swipe down from the upper right corner of the screen twice, then tap the gear icon. This will take you to Android settings. From here, scroll to the “Apps” menu. In there, scroll to the bottom to find the Renatus app, and tap it. Then, tap the “Storage” button. Finally, tap the “Clear App Data” button, and confirm on the pop-up. Once this is complete, the “Clear App Data” button should gray out.
As a final step, tap the circle icon in the bottom menu. The Renatus app should begin to load again. As it does, you will need to watch for the three pop-up prompts again. As you see them, tap the “Allow” button for each.
At this point, the 75F Tablet Provisioning process is complete, and the tablet is ready for packing and shipment.
Comments
0 comments
Please sign in to leave a comment.